
Nolan N100-5 Manual
Manual en PDF · 116 Páginas
Español



Verificación rápida
Respuesta incorrecta, inténtalo de nuevo.
Chatee con su manual de Nolan N100-5 usando IA
Obtenga respuestas instantáneas de IA de su manual de Nolan N100-5
Pregunte lo que quiera sobre Nolan N100-5. Las respuestas provienen de este manual, con las páginas en las que se basan.
N100-5 Programa de mantenimiento
Deje que el casco se seque en un lugar ventilado con el visor abierto despues del uso. Mantengalo alejado de fuentes de calor.
Retire el visor interior y limpie suavemente con jabon liquido neutro y pano humedo. Enjuague bajo agua corriente.
Revise regularmente el estiramiento correcto para prevenir movimiento y rayado de superficies.
Si el visor esta danado o profundamente rayado reduciendo la visibilidad, reemplacelo inmediatamente.
Solo lavar a mano en agua tibia (max 30 C) con jabon neutro. No lavar en maquina.
Haz una Pregunta
¿Recomiendas N100-5?
Sí NoPreguntas frecuentes
Es un casco modular para motocicleta con mentonera abatible, sistema de visor, protección solar interna y características centradas en el confort para el uso diario en carretera.
¿Esta respuesta fue útil?
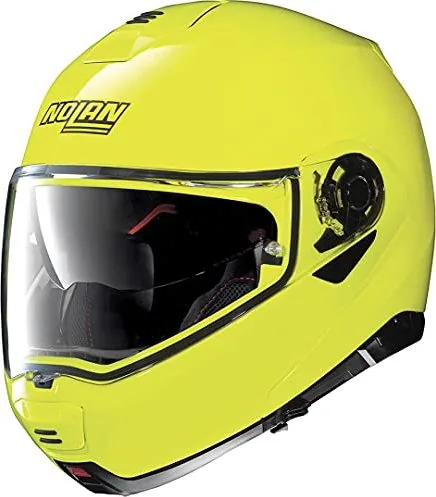
El acabado de alta visibilidad ayuda a que el motorista destaque con más facilidad en el tráfico, lo que puede ser especialmente útil en zonas urbanas concurridas, con poca luz o con clima cambiante.
¿Esta respuesta fue útil?
La mentonera utiliza un proceso de apertura en dos pasos con palancas separadas para desbloquear y abrir. Esto facilita el uso con una sola mano y ayuda a reducir las aperturas accidentales.
¿Esta respuesta fue útil?
Sí. El casco admite una posición de apertura mínima del visor para favorecer el flujo de aire y también puede usar un visor interior Pinlock para mejorar la resistencia al empañamiento en condiciones húmedas o frías.
¿Esta respuesta fue útil?
Sí. Las carrilleras, el cubrecuello y el forro son extraíbles, lo que facilita la limpieza y ayuda a mantener un mejor ajuste y un interior más fresco con el paso del tiempo.
¿Esta respuesta fue útil?
Sí. El casco está preparado para sistemas de comunicación N-Com, según la versión. Algunas piezas de espuma interior pueden necesitar retirarse durante la instalación de componentes compatibles.
¿Esta respuesta fue útil?
Ventajas y Desventajas
Ventajas

- La mentonera Dual Action mejora la comodidad y ayuda a evitar aperturas accidentales.
- El diseño de alta visibilidad aumenta la presencia del motorista en el tráfico y con poca luz.
- La pantalla solar VPS y el soporte opcional Pinlock mejoran la visibilidad con clima cambiante.
- El acolchado extraíble y el sistema de ventilación mejoran el confort y facilitan el mantenimiento.
Desventajas

- El diseño modular puede resultar más complejo que un casco integral simple.
- Las piezas del visor, VPS y Pinlock requieren un manejo cuidadoso para evitar arañazos o desgaste.
- La protección depende de un ajuste correcto y de un buen cierre, por lo que la talla es muy importante.
- Algunos accesorios y funciones pueden variar según la versión o requerir instalación aparte.
Producto Especificación
Tipo
Casco Modular
Caracteristicas
Visor Solar Integrado
Peso
1,65 kg
Producto Descripción
Nolan N100-5 de alta visibilidad (varios tamaños)
El Nolan N100-5 Hi-Visibility está diseñado para motoristas que buscan un casco modular práctico, con un fuerte enfoque en la seguridad, la visibilidad y el confort diario. Pensado para su uso en motocicleta, combina una mentonera abatible, un sistema de visor transparente y un acabado de alta visibilidad que ayuda al conductor a destacar con más facilidad en el tráfico. La sensación general es moderna, funcional y pensada para la conducción real.
Una de sus características más destacadas es el sistema de mentonera Dual Action. Este mecanismo está diseñado para abrirse con una sola mano y, al mismo tiempo, ayudar a reducir el riesgo de liberación accidental. Los motoristas pueden cambiar entre una configuración totalmente cerrada para máxima protección y una configuración abierta para mayor comodidad en paradas o en tráfico más lento. Esa flexibilidad hace que el casco resulte atractivo tanto para usuarios urbanos como para quienes viajan largas distancias.
La visibilidad es otra gran fortaleza. El casco admite un visor exterior estándar, una posición de apertura mínima para favorecer el flujo de aire y desempañar, y una pantalla solar interna VPS para condiciones de mucha luz. Para los motoristas que se enfrentan a cambios de clima, el visor interior Pinlock opcional añade una capa extra de ayuda ضد el empañamiento. En conjunto, estos elementos ayudan a mantener una visión más clara de la carretera cuando baja la temperatura, aumenta la humedad o el sol se vuelve intenso.
El confort y la adaptabilidad también reciben una atención seria. El acolchado interior extraíble, las carrilleras y las secciones del cubrecuello están pensados para mejorar el ajuste y simplificar la limpieza. El sistema de ventilación ayuda a canalizar aire fresco a través del casco, reducir la acumulación de calor y limitar el empañamiento del visor. Además, el casco está preparado para sistemas de comunicación N-Com, lo que lo convierte en una opción inteligente para quienes quieren mantenerse conectados sin renunciar al confort.
Notas
- Más adecuado para motoristas que buscan un casco modular con gran versatilidad diaria.
- Disponible en varios tamaños, por lo que conviene comprobar bien el ajuste para asegurar estabilidad y confort.
- Sigue las indicaciones de limpieza y mantenimiento para proteger el visor, el acolchado y la pantalla solar.
- La inspección regular de las correas, las piezas del visor y los sistemas de cierre ayuda a conservar el rendimiento con el tiempo.
- El estilo de alta visibilidad añade una ventaja práctica de seguridad en tráfico denso y situaciones de poca luz.
Buscar: 67.706 Manuales en línea


Escribe la marca o modelo