Manual.ly Logo

Hudora Big Wheel Style 230 Manual

0,0 · 0 Valoraciones

Manual en PDF · 12 Páginas

Español

M: qwen/qwen3.5-flash-20260224
página

/ 12

Loading...
6b9c0186bb04cc6a18c95ab4b04250b95153 page 5
5/12
INSTRUCTIONS ON ASSEMBLY
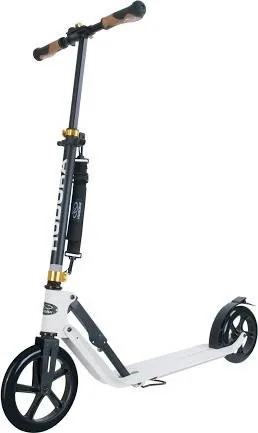
No tools are required to assemble the product. The scooter is delivered in its
transport form (folded)! (Picture 1)
Please proceed as follows to get the scooter ready for use
• Pull the lever that is in the direction of movement, located to the right of the folding
mechanism, in order to release the transportation lock. (Picture. 2)
• Unfold the scooter‘s handlebars upwards.
• Now push the folding hinge towards the handlebar stem until you hear it click
into place. (Picture 3)
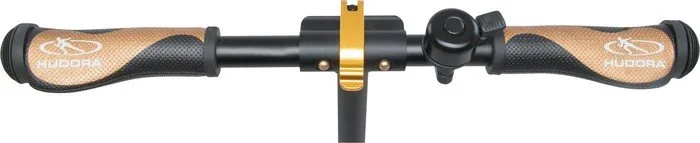
• Loosen the quick release fastener on the T-piece of the handlebar shaft by
pushing the lever away from the T-piece. (Picture. 4). Insert the handlebar
grips in the T-piece of the handlebar grip. Use your thumbs to press down
both locking buttons until the the grips can be easily pushed into the T-section.
Turn the handlebar grips until the locking buttons are positioned in the two
openings intended for them and you hear them click into place. Check that
both handlebar grips are fitted correctly by pulling both outwards. Do not let
the two hand grips move out of their locking mechanism, once they are fitted
properly. Now close the quick release fastener on the T-piece of the handlebar
shaft, by inserting the lever into the T-piece. In case the grips are not firmly
fitted enough, open the quick release fastener again and turn the screw on the
opposite side deeper into the thread, so that the fastening clamp tightly sits on
the T-piece.
• Loosen the quick release lock on the handlebar rod by pushing the lever of the quick
release lock until the lever is parallel to the handlebar grip. (Picture 5)
• The handlebars can be locked into place at 4 different heights. Pull the hand-
lebar rod out of the handlebar stem until it is at the required height and the
relevant button has snapped into place. (Picture 6) The maximum height can-
not be exceeded due to the integrated lock.
• Now close the quick release lock by pushing the lever down to the handlebar
stem. (Picture 5)
• In the event that the handlebar does not sit tight enough at the selected height,
open the quick release fastener again and turn the screw on the opposite side
deeper into the thread, so that the fastening clamp tightly sits on the handle-
bar. Repeat this process until the handlebar can be securely adjusted.
• All parts should always by checked for secure fitting before being used, in
particular the folding mechanism, the steering lock and the wheels.
To get the scooter ready for transport again, please carry out the following
actions
• Loosen the quick release lock by pushing the lever of the quick release lock
away from the handlebar stem. (Picture 5)
• Please press the locking button so that the handlebar rod can be moved. (Pic-
ture 6)
• Push the handlebar rod as far as it will go into the handlebar stem.
• Close the quick release lock by pushing the lever down to the handlebar stem.
(Picture 5)
• Loosen the quick release fastener on the T-piece of the handlebar shaft by
pushing the lever away from the T-piece.
• Use your thumbs to press both locking buttons in the handlebar grips and pull the
handlebar grips outwards until they are released completely from the T-sec-
tion. (Picture 4)
• Press the handlebar grips far down until they are parallel to the handlebar
shaft and can be pressed it into the appropriate supports.
• Now close the quick release fastener on the T-piece of the handlebar shaft, by
placing the lever around the T-piece.
• Pull the lever that is in the direction of movement, located to the right of the
folding mechanism, in order to release the assembly lock. (Picture. 2)
• Fold up the scooter by moving the handlebar rod towards the back wheel until
you hear the transport lock click into place. (Picture. 1)
USAGE INSTRUCTIONS
Nothing’s easy at rst …
... most accidents happen to “beginners” within the first ten minutes. Particular
care should be taken during this stage.
Usage instructions
The scooter moves when a foot is used to regularly push off, just as with well-
known children’s scooters. Braking is no problem either - simply step on the
friction brake over the back wheel (mudguard).
We recommend folding the scooter by hand after each ride or using the double
stand located under the running board. Its use is ensured through simply folding
and unfolding.
Aluminium is a good and light material but should also be handled carefully as it
is not as hard as steel, for example.
MAINTENANCE AND STORAGE
Use a dry or damp cloth only to clean the product; do not use special cleaning
agents! Check the product for damage or traces of wear and tear before and after
each use. Do not make any structural changes. For your own safety, please use
original spare parts only. These can be sourced from HUDORA. If parts become
damaged or if sharp edges or corners should develop, the product may not be
used any more. If in any doubt, please contact our service team (http://www.
hudora.de/). Store the product in a safe place where it is protected from the
elements, cannot be damaged, and cannot injure anyone.
Replace damaged or worn assembly parts in order to ensure the safety of your
scooter.
WHEEL CHANGE
Replacement wheels are available as accessories from http://www.hudora.
de/service/ and should be replaced when they are worn down. To change the
wheels, loosen the axle fitting with two Allen keys and take the wheels off the
axle. A screwdriver or Allen key can be used to push the bearings out of the wheel
to use them in the new wheel. However, it is usually advisable to change the
bearings when the wheels are changed. Put the bearings into the new wheel with
the bolt spacer and mount them to the frame with the axle screws. Make sure the
axle has been screwed on tightly before starting again!
Bearings
Your kick scooter is equipped with precision ball bearings, which were filled with
grease under high pressure, during manufacture. For this reason, the rollers of
the kick scooter only run lightly and swiftly, while under load. Bearings are main-
tenance-free, but they are wear parts. Caution! Worn bearings make conspicuous
audible noises and their function is cons- trained. In order to maintain optimal
riding pleasure and to ensure lasting safety, you should replace bearings, as soon
as they begin to exhibit signs of being worn. In the case of full load and daily use
we recommend the replacement of the rollers and bearings twice a year. Bea-
rings are available as accessories under http://www.hudora.de/service/.
DISPOSAL ADVICE
At the end of the product’s life, please dispose of it at an appropriate collection
point in your area. Local waste management companies will be able to answer
your questions on this.
SERVICE
We make every effort to deliver faultless products. If faults do arise however, we
put just as much effort into rectifying them. Therefore, you can find numerous
information on the product, replacement parts, solutions to problems and lost
assembly manuals at http://www.hudora.de/service/
SPARE PARTS AND ORIGINAL ACCESSORIES
AVAILABLE AT: www.hudora.de/service/
EN
INSTRUCTIONS ON ASSEMBLY AND USE
All images are examples of the design.

Chatee con su manual de Hudora Big Wheel Style 230 usando IA

Obtenga respuestas instantáneas de IA de su manual de Hudora Big Wheel Style 230

Pregunte lo que quiera sobre Hudora Big Wheel Style 230. Las respuestas provienen de este manual, con las páginas en las que se basan.

Big Wheel Style 230 Programa de mantenimiento

Recuérdame cuándo corresponde realizar el mantenimiento
Semestral
Reemplazar ruedas y rodamientos

Bajo carga completa y uso diario, reemplazar rodillos y rodamientos cada seis meses para garantizar la seguridad.

Mostrar en el manual (página 5)
Antes y después de cada uso
Inspeccionar en busca de daños y desgaste

Verificar el producto en busca de daños o rastros de desgaste antes y después de cada uso.

Mostrar en el manual (página 5)

Recordatorios de mantenimiento gratuitos

Según la fecha de compra. Siempre gratis, cancela la suscripción cuando quieras.

Al enviar, aceptas la política de privacidad. Cancela la suscripción con un clic en cualquier correo electrónico.
M: QW-35-FL

Haz una Pregunta

0/1000

¿Recomiendas Big Wheel Style 230?

Sí No

Preguntas frecuentes

A

No se necesitan herramientas. Despliega el manillar usando los cierres de bloqueo del mecanismo de plegado. Asegúrate de que todos los sujetadores de liberación rápida hagan clic seguramente. Verifica la alineación antes de montar.

¿Esta respuesta fue útil?

A

El patinete soporta hasta 120 kg. Es un patinete de ocio Clase A destinado a áreas públicas y adultos o niños mayores dentro de límites.

¿Esta respuesta fue útil?

A

Sí. Debes usar casco, rodilleras y codreras. No andes descalzo o sin zapatos para prevenir lesiones en el tablero de pie.

¿Esta respuesta fue útil?

A

Reemplaza rodillos y rodamientos cada seis meses con uso diario intenso. Escucha el ruido que indica desgaste. Usa piezas de repuesto originales para seguridad.

¿Esta respuesta fue útil?

A

No. No andes al crepúsculo, de noche, o en condiciones de baja visibilidad. Usa en senderos solo durante el día.

¿Esta respuesta fue útil?

A

Suelta los cierres rápidos en el vástago del manillar. Dobra el vástago del manillar hacia la rueda trasera hasta que el bloqueo de transporte haga clic en su lugar. Asegúrate de que el caballete esté plegado.

¿Esta respuesta fue útil?

A

No lo tires a la basura normalmente. Llévalo a un punto de recogida local al final de su ciclo de vida. Usa los sistemas de gestión de residuos proporcionados localmente.

¿Esta respuesta fue útil?

M: qwen/qwen3.5-flash-20260224

Ventajas y Desventajas

Ventajas

  • No se requieren herramientas para el ensamblaje
  • Chasis de aluminio ligero
  • Cuatro ajustes de altura
  • Límite de peso sólido de 120 kg
  • Fácil plegado para transporte
VS

Desventajas

  • Las ruedas necesitan reemplazo regular
  • El freno se calienta con el uso
  • No se permiten saltos
  • Equipo de protección requerido
  • Ensamblaje de mecanismo por adulto
M: qwen/qwen3.5-flash-20260224

Producto Especificación

Tipo

Patinete

Material

Aluminio

Dimensiones

97,00 x 14,00 x 106,00 cm

Ruedas

23,01 cm (delanteras), 20,50 cm (traseras)

Rodamientos

ABEC 5

Peso máximo del usuario

120,00 kg

Tipo de rueda

Plástico

Suspensión

Ninguna

Peso

5,20 kg

M: qwen/qwen3.5-flash-20260224

Producto Descripción

Descubre el Hudora Big Wheel Style 230 Patinete

Andar en patinete de impulso ofrece gran movilidad y diversión. El Hudora Big Wheel Style 230 Patinete es una elección confiable para actividades de ocio al aire libre. Al comprar, recibirás el Manual del Hudora Big Wheel Style 230 Patinete para asistir con la configuración y el uso. Seguir estas instrucciones garantiza una experiencia segura y duradera para ti.

Ensamblaje y Especificaciones

Configurar el patinete no requiere herramientas. Llega en estado de transporte plegado listo para desplegar. El manillar se ajusta a cuatro alturas para diferentes tamaños de usuario. La altura máxima alcanza 1065 mm. El chasis está construido de aluminio ligero. Soporta un peso máximo de usuario de 120 kg. Este patinete de Clase A está destinado a áreas públicas y no para juego en interiores.

Directrices de Seguridad

La seguridad es crucial para todos los usuarios. El equipo de protección incluyendo casco y protecciones es obligatorio. Nunca andes sin zapatos para prevenir lesiones en el pie. Evita andar en pendientes, de noche, o en carreteras con tráfico. El freno de fricción trasero puede calentarse durante un uso extensivo. No toques el tambor del freno hasta que se enfríe para evitar quemaduras.

Consejos de Mantenimiento

Limpia el chasis de aluminio solo con un paño húmedo. Evita agentes de limpieza agresivos. Inspecciona las ruedas y rodamientos regularmente para ver desgaste. Reemplaza las partes desgastadas inmediatamente para mantener la seguridad. Para uso diario intenso, reemplaza los rodillos y rodamientos cada seis meses. Las piezas de repuesto originales están disponibles en el sitio web del fabricante. Guarda el producto en un lugar seco. Esto previene el óxido en las partes metálicas. Mantiene el patinete seguro cuando no se usa. Puedes plegarlo a mano después de cada recorrido. Usa el caballete doble debajo del tablero de pie también.

Información Adicional

El patinete requiere ensamblaje del mecanismo de plegado por un adulto. Los principiantes deben tener precaución durante los primeros diez minutos. La mayoría de los accidentes ocurren durante esta fase. Asegúrate de que el logo apunte hacia adelante durante el uso. Verifica la orientación del manillar cuidadosamente. Guarda el embalaje para preguntas futuras. Puedes entregar el manual a un tercero si lo vendes. Siempre verifica los sujetadores de liberación rápida antes de montar. Si las piezas se sienten sueltas, ajusta los pernos para apretar la abrazadera. Las ruedas de repuesto están disponibles como accesorios. Los rodamientos son unidades de precisión llenas de grasa. Funcionan suavemente bajo carga pero se desgastan con el tiempo. Escucha el ruido que indica desgaste o daño.

No elimines la unidad con la basura normal. Usa los sistemas de recolección local para la eliminación. El servicio Hudora proporciona soporte para fallos o manuales perdidos. Siempre verifica la alineación de la dirección antes de cada recorrido. Asegúrate de que el caballete esté plegado durante la operación.

Nota de Uso: Este patinete no es para saltos. Mantente en senderos planos para los mejores resultados.

M: qwen/qwen3.5-flash-20260224

© Copyright 2026 Manual.ly
