6LE000121E 06 Hager 02.22 - 6LE000121E
a r
Módulo 6 entradas 24...230
e t
Módulo 6 entradas 24...230
z s
6 st. ingångar 24...230
i o
Moduler med 6 innganger
24...230 V AC/DC
y k
24... 230 6
Caract techniques / T Daten / T
characteristics / T kenmerken / Car tecniche /
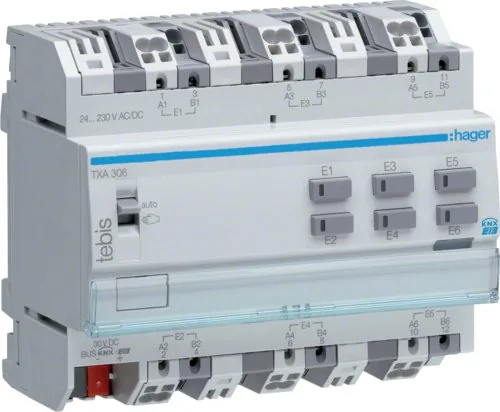
TXA306
Tensión
de señal
Tensão
de commando
Signalspänning
Signaliser
spenning
24 ... 230
AC (50Hz) / DC
Distancia
maxíma entre
los contactos
conexionados
y el módulo
Distância
máxima
de
ligação
por entrada
Max. längd på
ingångskabeln
Maksimumsavstand
for tilkobling
100
Tensión
alimentación
Tensão de
alimentação
Strömförsörjning Systemspenning
30
Consumo
típico
en el Bus
Consumo
típico
no Bus
Typisk
egenförbrukning
på buss-systemet
Typisk forbruk på
BUS-kabelen
6
Consumo
máximo
en el Bus
Consumo
máximo
no Bus
Max.
egenförbrukning
på buss-systemet
Maksimalt forbruk
på BUS-kabelen
7
Dimensiones
Atravancamentos
Mått Bredde
6
El grado
de la protección
O grau
de proteção
Kapslingsklass
Grad av
beskyttelse
IP 20
IP 30 (plastron)
T° de
funcionamiento
Ta de
funcionamento
Driftstemperatur
I drifts -
temperatur
0 °C ➡ + 45 °C
T°
almacenamiento
Ta de
armazenamento
Lagringstemperatur Lagrings temperatur
- 20 °C
➡
+ 70 °C
Medio de
comunicación
KNX
Média de comu-
nicação KNX
Kommunikations-
medium KNX
Kommunikas-
jonsmedia KNX
TP1
Modo configu-
ración KNX
Modo de confi-
guração KNX
Konfigurations-
läge KNX
Moduskonfi-gurasjon
KNX
S-mode
Conexión / Ligações / Anslutningar / Tilkobling /
0,75 ➡ 2,5
RR
F
Información de sistema
Este dispositivo es un product
cumple con la norma KNX. Par
sistema son necesarios conocimientos específicos y
detallados, adquiridos mediante cursos de formación
sobre KNX. La pr
puesta en marcha del dispositivo se r
ayuda de un software certificado por KNX.
Descripción funcional
Los módulos de entr
interfacer contactos libr
alimentados en 24...230V AC/DC con el bus KNX.
P
o contactos de alarma pueden así volverse
comunicantes.
• 6 vías independientes con reconocimient
automático del tipo de circuit
(24...230V AC/DC o libr
• Detección de corte r
filtrar las falsas alarmas debidas al corte par
entradas conectadas a la misma fase de
Las funciones concretas de estos pr
dependen de la configuración y de la par
Leyenda
1
TXA310
30V DC
-
+
Bus
auto
E8
E7
E10 E10
E9 E9
13
15
E7
17
E9
19
14
16
18 20
C8 C10
7
9
E5
11
8
10
12
E6
E2
E1
E4 E4
E3 E3
E6 E6
E5 E5
1
3
E1
5
E3
2
4
6
E2 E4
auto
TXA310
30V D C
-
+
Bus
auto
E8
E7
E10 E10
E9 E9
13
15
E7
17
E9
19
14
16
18 20
C8 C10
7
9
E5
11
8
10
12
E6
E2
E1
E4 E4
E3 E3
E6 E6
E5 E5
1
3
E1
5
E3
2
4
6
E2 E4
E10 E10
auto
Ech 60%
L3
L2
L1
N
L3
L2
L1
N
auto
E6
E5
E4
E3
E8 E8
E7 E7
E10 E10
E9 E9
TXA 310
E2
E1
30 V DC
-
+
BUS
/
19
1
35 79 11 13 15
46 81 01 21 41 6
2
17
18 20
NL
E1
NL
E2
NL
E4
NL
E3
NL
E5
NL
E7
NL
E9
NL
E6
NL
E8
NL
E10
230 V A C
1
2
3
4
Conmutador
2
TXA310
30V DC
-
+
Bus
auto
E8
E7
E10 E10
E9 E9
13
15
E7
17
E9
19
14
16
18 20
C8 C10
7
9
E5
11
8
10
12
E6
E2
E1
E4 E4
E3 E3
E6 E6
E5 E5
1
3
E1
5
E3
2
4
6
E2 E4
auto
TXA310
30V D C
-
+
Bus
auto
E8
E7
E10 E10
E9 E9
13
15
E7
17
E9
19
14
16
18 20
C8 C10
7
9
E5
11
8
10
12
E6
E2
E1
E4 E4
E3 E3
E6 E6
E5 E5
1
3
E1
5
E3
2
4
6
E2 E4
E10 E10
auto
Ech 60%
L3
L2
L1
N
L3
L2
L1
N
auto
E6
E5
E4
E3
E8 E8
E7 E7
E10 E10
E9 E9
TXA 310
E2
E1
30 V DC
-
+
BUS
/
19
1
35 79 11 13 15
46 81 01 21 41 6
2
17
18 20
NL
E1
NL
E2
NL
E4
NL
E3
NL
E5
NL
E7
NL
E9
NL
E6
NL
E8
NL
E10
230 V A C
1
2
3
4
Led
3
TXA310
30V DC
-
+
Bus
auto
E8
E7
E10 E10
E9 E9
13
15
E7
17
E9
19
14
16
18 20
C8 C10
7
9
E5
11
8
10
12
E6
E2
E1
E4 E4
E3 E3
E6 E6
E5 E5
1
3
E1
5
E3
2
4
6
E2 E4
auto
TXA310
30V D C
-
+
Bus
auto
E8
E7
E10 E10
E9 E9
13
15
E7
17
E9
19
14
16
18 20
C8 C10
7
9
E5
11
8
10
12
E6
E2
E1
E4 E4
E3 E3
E6 E6
E5 E5
1
3
E1
5
E3
2
4
6
E2 E4
E10 E10
auto
Ech 60%
L3
L2
L1
N
L3
L2
L1
N
auto
E6
E5
E4
E3
E8 E8
E7 E7
E10 E10
E9 E9
TXA 310
E2
E1
30 V DC
-
+
BUS
/
19
1
35 79 11 13 15
46 81 01 21 41 6
2
17
18 20
NL
E1
NL
E2
NL
E4
NL
E3
NL
E5
NL
E7
NL
E9
NL
E6
NL
E8
NL
E10
230 V A C
1
2
3
4
Pulsador
4
TXA310
30V DC
-
+
Bus
auto
E8
E7
E10 E10
E9 E9
13
15
E7
17
E9
19
14
16
18 20
C8 C10
7
9
E5
11
8
10
12
E6
E2
E1
E4 E4
E3 E3
E6 E6
E5 E5
1
3
E1
5
E3
2
4
6
E2 E4
auto
TXA310
30V D C
-
+
Bus
auto
E8
E7
E10 E10
E9 E9
13
15
E7
17
E9
19
14
16
18 20
C8 C10
7
9
E5
11
8
10
12
E6
E2
E1
E4 E4
E3 E3
E6 E6
E5 E5
1
3
E1
5
E3
2
4
6
E2 E4
E10 E10
auto
Ech 60%
L3
L2
L1
N
L3
L2
L1
N
auto
E6
E5
E4
E3
E8 E8
E7 E7
E10 E10
E9 E9
TXA 310
E2
E1
30 V DC
-
+
BUS
/
19
1
35 79 11 13 15
46 81 01 21 41 6
2
17
18 20
NL
E1
NL
E2
NL
E4
NL
E3
NL
E5
NL
E7
NL
E9
NL
E6
NL
E8
NL
E10
230 V A C
1
2
3
4
Pulsador luminoso de direccionamiento
físico
F
En posición
TXA310
30V DC
-
+
Bus
auto
E8
E7
E10 E10
E9 E9
13
15
E7
17
E9
19
14
16
18 20
C8 C10
7
9
E5
11
8
10
12
E6
E2
E1
E4 E4
E3 E3
E6 E6
E5 E5
1
3
E1
5
E3
2
4
6
E2 E4
auto
TXA310
30V D C
-
+
Bus
auto
E8
E7
E10 E10
E9 E9
13
15
E7
17
E9
19
14
16
18 20
C8 C10
7
9
E5
11
8
10
12
E6
E2
E1
E4 E4
E3 E3
E6 E6
E5 E5
1
3
E1
5
E3
2
4
6
E2 E4
E10 E10
auto
Ech 60%
L3
L2
L1
N
L3
L2
L1
N
auto
E6
E5
E4
E3
E8 E8
E7 E7
E10 E10
E9 E9
TXA 310
E2
E1
30 V DC
-
+
BUS
/
19
1
35 79 11 13 15
46 81 01 21 41 6
2
17
18 20
NL
E1
NL
E2
NL
E4
NL
E3
NL
E5
NL
E7
NL
E9
NL
E6
NL
E8
NL
E10
230 V A C
1
2
3
4
conmutador 1 , los pulsadores 3
permiten simular los contactos conectados.
El estado de los LED 2 depende de la configuración
y de la parametrización.
El parpadeo de todos los LED 2 indica la carga
de un software de aplicación err
Detección del tipo de contacto conectado
El módulo puede detectar automáticament
tensión conectada en cada entr
alterna o ausencia de tensión par
potencial).
En la primera pr
repr
conectada o tras un r
el tipo de tensión detectado.
Siga el procedimiento descrit
1. Conectar el producto al Bus KNX
2. Progr
3. Conectar los circuitos a las entradas
4. Cerrar el contacto unido a la entr
5. Abrir el contacto unido a la entrada
6.
Después del reinicio del pr
ejemplo), el procedimiento de memorización no es
necesario si no se ha modificado el tipo de circuito
conectado.
T4
Pulsar el pulsador luminoso 4 par
direccionamiento físico del pr
presencia bus :
indicador luminoso encendido = presencia bus
y producto en dir
Perturbación de la señal de entr
En algunos tipos de instalación (bandejas de
cables, pasacables o cables multiconductores), es
necesario respetar la separ
fuerte y corriente débil. La pr
conectados a la red de alimentación de la instalación
(230 V o 400 V) con los cables de señal conectados
a las entradas del TXA306 pueden llevar a cr
corrientes inducidas en los cables conectados a las
entradas y gener
El uso de cables blindados para la cone
entradas permit
corrientes inducidas.
Este apar
obligatoriamente por un electricista
cualificado según as normas de instalación
vigentes en el país.
Respetar las reglas de instalación TB
Si se conectan varias entradas sin
tensión, deben mantenerse t
independientes (sin ningún punto
común).
No obstante, sigue siendo posible usar
un punto común si se emplean contactos
alimentados con 24 … 230
No conectar botones/pulsadores ni
interruptor
entradas del pr
No conectar testigos luminosos en par
a los contactos, botones/pulsador
interruptor
t
F
Informações do sistema
Este dispositivo é um produt
está em conformidade com a norma KNX. Uma
qualificação específica detalhada obtida através da
formação KNX é necessária para compr
sistema. As oper
e colocação em funcionamento do dispositivo são
realizadas com o softwar
Descrição funcional
Os módulos de entradas universais permitem ligar
contactos livres de potencial ou alimentados em
24...230V AC/DC com o bus KNX.
P
botões de comando, interrupt
contactos de alarme.
• 6 canais independentes com reconheciment
automático do tipo de circuit
(24...230V AC/DC ou livr
• Detecção de corte sector
permite filtrar os falsos alertas provocados pelo
corte de corrente para as entradas conectadas
à mesma fase de referência.
As funções exactas destes pr
da configuração e da par
Legenda
1
TXA310
30V DC
-
+
Bus
auto
E8
E7
E10 E10
E9 E9
13
15
E7
17
E9
19
14
16
18 20
C8 C10
7
9
E5
11
8
10
12
E6
E2
E1
E4 E4
E3 E3
E6 E6
E5 E5
1
3
E1
5
E3
2
4
6
E2 E4
auto
TXA310
30V D C
-
+
Bus
auto
E8
E7
E10 E10
E9 E9
13
15
E7
17
E9
19
14
16
18 20
C8 C10
7
9
E5
11
8
10
12
E6
E2
E1
E4 E4
E3 E3
E6 E6
E5 E5
1
3
E1
5
E3
2
4
6
E2 E4
E10 E10
auto
Ech 60%
L3
L2
L1
N
L3
L2
L1
N
auto
E6
E5
E4
E3
E8 E8
E7 E7
E10 E10
E9 E9
TXA 310
E2
E1
30 V DC
-
+
BUS
/
19
1
35 79 11 13 15
46 81 01 21 41 6
2
17
18 20
NL
E1
NL
E2
NL
E4
NL
E3
NL
E5
NL
E7
NL
E9
NL
E6
NL
E8
NL
E10
230 V A C
1
2
3
4
Comutador
2
TXA310
30V DC
-
+
Bus
auto
E8
E7
E10 E10
E9 E9
13
15
E7
17
E9
19
14
16
18 20
C8 C10
7
9
E5
11
8
10
12
E6
E2
E1
E4 E4
E3 E3
E6 E6
E5 E5
1
3
E1
5
E3
2
4
6
E2 E4
auto
TXA310
30V D C
-
+
Bus
auto
E8
E7
E10 E10
E9 E9
13
15
E7
17
E9
19
14
16
18 20
C8 C10
7
9
E5
11
8
10
12
E6
E2
E1
E4 E4
E3 E3
E6 E6
E5 E5
1
3
E1
5
E3
2
4
6
E2 E4
E10 E10
auto
Ech 60%
L3
L2
L1
N
L3
L2
L1
N
auto
E6
E5
E4
E3
E8 E8
E7 E7
E10 E10
E9 E9
TXA 310
E2
E1
30 V DC
-
+
BUS
/
19
1
35 79 11 13 15
46 81 01 21 41 6
2
17
18 20
NL
E1
NL
E2
NL
E4
NL
E3
NL
E5
NL
E7
NL
E9
NL
E6
NL
E8
NL
E10
230 V A C
1
2
3
4
Led
3
TXA310
30V DC
-
+
Bus
auto
E8
E7
E10 E10
E9 E9
13
15
E7
17
E9
19
14
16
18 20
C8 C10
7
9
E5
11
8
10
12
E6
E2
E1
E4 E4
E3 E3
E6 E6
E5 E5
1
3
E1
5
E3
2
4
6
E2 E4
auto
TXA310
30V D C
-
+
Bus
auto
E8
E7
E10 E10
E9 E9
13
15
E7
17
E9
19
14
16
18 20
C8 C10
7
9
E5
11
8
10
12
E6
E2
E1
E4 E4
E3 E3
E6 E6
E5 E5
1
3
E1
5
E3
2
4
6
E2 E4
E10 E10
auto
Ech 60%
L3
L2
L1
N
L3
L2
L1
N
auto
E6
E5
E4
E3
E8 E8
E7 E7
E10 E10
E9 E9
TXA 310
E2
E1
30 V DC
-
+
BUS
/
19
1
35 79 11 13 15
46 81 01 21 41 6
2
17
18 20
NL
E1
NL
E2
NL
E4
NL
E3
NL
E5
NL
E7
NL
E9
NL
E6
NL
E8
NL
E10
230 V A C
1
2
3
4
Botão de comando
4
TXA310
30V DC
-
+
Bus
auto
E8
E7
E10 E10
E9 E9
13
15
E7
17
E9
19
14
16
18 20
C8 C10
7
9
E5
11
8
10
12
E6
E2
E1
E4 E4
E3 E3
E6 E6
E5 E5
1
3
E1
5
E3
2
4
6
E2 E4
auto
TXA310
30V D C
-
+
Bus
auto
E8
E7
E10 E10
E9 E9
13
15
E7
17
E9
19
14
16
18 20
C8 C10
7
9
E5
11
8
10
12
E6
E2
E1
E4 E4
E3 E3
E6 E6
E5 E5
1
3
E1
5
E3
2
4
6
E2 E4
E10 E10
auto
Ech 60%
L3
L2
L1
N
L3
L2
L1
N
auto
E6
E5
E4
E3
E8 E8
E7 E7
E10 E10
E9 E9
TXA 310
E2
E1
30 V DC
-
+
BUS
/
19
1
35 79 11 13 15
46 81 01 21 41 6
2
17
18 20
NL
E1
NL
E2
NL
E4
NL
E3
NL
E5
NL
E7
NL
E9
NL
E6
NL
E8
NL
E10
230 V A C
1
2
3
4
Botão de comando luminoso de
endereçamento físico
F
Na posição
TXA310
30V DC
-
+
Bus
auto
E8
E7
E10 E10
E9 E9
13
15
E7
17
E9
19
14
16
18 20
C8 C10
7
9
E5
11
8
10
12
E6
E2
E1
E4 E4
E3 E3
E6 E6
E5 E5
1
3
E1
5
E3
2
4
6
E2 E4
auto
TXA310
30V D C
-
+
Bus
auto
E8
E7
E10 E10
E9 E9
13
15
E7
17
E9
19
14
16
18 20
C8 C10
7
9
E5
11
8
10
12
E6
E2
E1
E4 E4
E3 E3
E6 E6
E5 E5
1
3
E1
5
E3
2
4
6
E2 E4
E10 E10
auto
Ech 60%
L3
L2
L1
N
L3
L2
L1
N
auto
E6
E5
E4
E3
E8 E8
E7 E7
E10 E10
E9 E9
TXA 310
E2
E1
30 V DC
-
+
BUS
/
19
1
35 79 11 13 15
46 81 01 21 41 6
2
17
18 20
NL
E1
NL
E2
NL
E4
NL
E3
NL
E5
NL
E7
NL
E9
NL
E6
NL
E8
NL
E10
230 V A C
1
2
3
4
do comutador 1 , os botões de
comando 3 permitem simular os contactos
conectados.
O estado dos LED 2 depende da configuração
e da parametrização.
T2 ia piscar simultaneamente indica o
erro no download de um softwar
Deteção do tipo de contacto ligado
O módulo consegue detetar automaticamente o tipo
de tensão ligada a cada entrada (tensão contínua,
tensão alternada ou ausência de tensão para um
contacto livre de potencial).
Na primeira programação, depois de uma
reprogramação, depois de uma mudança de tipo de
tensão ligada ou depois de uma reinicialização, é
necessário memorizar o tipo de tensão detetado.
Seguir o procedimento abaixo:
1. Ligar o produto ao Bus KNX
2. Programar o produto através de ETS ou da
Easytool
3. Ligar os circuitos às entradas
4. Fechar o contacto ligado à entrada
5. Abrir o contacto ligado à entrada
6. Proceder da mesma forma para todas as entradas.
A seguir a uma reinicialização do produto (bus foi
desligado, por exemplo), não é necessário executar o
procedimento de memorização, se o tipo de circuito
ligado não tiver sido modificado.
Botão de comando de endereçamento físico 4
Premir o botão de comando luminoso 4 para
realizar o endereçamento físico do produto ou
verificar a presença bus
indicador luminoso aceso = presença bus
e produto em endereçamento físico.
Perturbação do sinal de entrada
Em determinados tipos de instalações (caminhos
de cabos, canais ou cabos multi condutores), é
necessário respeitar a separ
corrente fr
de alimentação da instalação (230V ou 400V) com
os fios de sinal ligados às entradas do TXA306
pode levar à criação de correntes induzidas nos fios
ligados às entradas e, desta forma, ger
indesejados.
A utilização de cabos blindados para ligação das
entradas permit
correntes induzidas.
Aparelho a ser instalado apenas por um
técnico habilitado de acordo com as
normas de instalação em vigor no pais.
Respeitar as regr
Se várias entradas livres de potencial
estiverem ligadas, devem permanecer
totalmente independentes (sem ponto em
comum).
A utilização de um ponto em comum é,
no entanto, possível caso sejam utilizados
contactos alimentados a 24 … 230
CC.
Não ligar botões de pressão ou
interruptor
entradas do pr
Não ligar luzes indicador
com contactos, botões de pr
interruptor
s
F
Systeminformation
Denna enhet är en produkt som ingår i KNX-
systemet och uppfyller KNX-standarden. Detaljer
expertkunskaper som tillhandahålls via KNX-
utbildning är nödvändiga för att förstå systemet.
Enhetens progr
utförs med hjälp av en KNX-certifierad pr
F
Universella ingångsmoduler ger möjlighet att
bilda gränssnitt mellan potentialfria kontakter eller
kontakter matade med 24...230 V växelström/
likström och KNX bussen. Exempelvis, på så sätt kan
tryckknappar,
strömställare, automater eller larmkontakter
kommunicer
• 6 fristående kanaler med automatisk igenkänning av
ansluten kretstyp (24...230V väx
eller potentialfri).
• Avkänning av strömförsörjningsavbrott från nätet
Denna avkänning ger möjlighet att filtrera falska larm
orsakade av avbrott för ingångar anslutna till samma
referensfas.
Vilka exakta funktioner som dessa produkt
på konfigur
Bildbeskrivning
1
TXA310
30V DC
-
+
Bus
auto
E8
E7
E10 E10
E9 E9
13
15
E7
17
E9
19
14
16
18 20
C8 C10
7
9
E5
11
8
10
12
E6
E2
E1
E4 E4
E3 E3
E6 E6
E5 E5
1
3
E1
5
E3
2
4
6
E2 E4
auto
TXA310
30V D C
-
+
Bus
auto
E8
E7
E10 E10
E9 E9
13
15
E7
17
E9
19
14
16
18 20
C8 C10
7
9
E5
11
8
10
12
E6
E2
E1
E4 E4
E3 E3
E6 E6
E5 E5
1
3
E1
5
E3
2
4
6
E2 E4
E10 E10
auto
Ech 60%
L3
L2
L1
N
L3
L2
L1
N
auto
E6
E5
E4
E3
E8 E8
E7 E7
E10 E10
E9 E9
TXA 310
E2
E1
30 V DC
-
+
BUS
/
19
1
35 79 11 13 15
46 81 01 21 41 6
2
17
18 20
NL
E1
NL
E2
NL
E4
NL
E3
NL
E5
NL
E7
NL
E9
NL
E6
NL
E8
NL
E10
230 V A C
1
2
3
4
Comutador
2
TXA310
30V DC
-
+
Bus
auto
E8
E7
E10 E10
E9 E9
13
15
E7
17
E9
19
14
16
18 20
C8 C10
7
9
E5
11
8
10
12
E6
E2
E1
E4 E4
E3 E3
E6 E6
E5 E5
1
3
E1
5
E3
2
4
6
E2 E4
auto
TXA310
30V D C
-
+
Bus
auto
E8
E7
E10 E10
E9 E9
13
15
E7
17
E9
19
14
16
18 20
C8 C10
7
9
E5
11
8
10
12
E6
E2
E1
E4 E4
E3 E3
E6 E6
E5 E5
1
3
E1
5
E3
2
4
6
E2 E4
E10 E10
auto
Ech 60%
L3
L2
L1
N
L3
L2
L1
N
auto
E6
E5
E4
E3
E8 E8
E7 E7
E10 E10
E9 E9
TXA 310
E2
E1
30 V DC
-
+
BUS
/
19
1
35 79 11 13 15
46 81 01 21 41 6
2
17
18 20
NL
E1
NL
E2
NL
E4
NL
E3
NL
E5
NL
E7
NL
E9
NL
E6
NL
E8
NL
E10
230 V A C
1
2
3
4
Led
3
TXA310
30V DC
-
+
Bus
auto
E8
E7
E10 E10
E9 E9
13
15
E7
17
E9
19
14
16
18 20
C8 C10
7
9
E5
11
8
10
12
E6
E2
E1
E4 E4
E3 E3
E6 E6
E5 E5
1
3
E1
5
E3
2
4
6
E2 E4
auto
TXA310
30V D C
-
+
Bus
auto
E8
E7
E10 E10
E9 E9
13
15
E7
17
E9
19
14
16
18 20
C8 C10
7
9
E5
11
8
10
12
E6
E2
E1
E4 E4
E3 E3
E6 E6
E5 E5
1
3
E1
5
E3
2
4
6
E2 E4
E10 E10
auto
Ech 60%
L3
L2
L1
N
L3
L2
L1
N
auto
E6
E5
E4
E3
E8 E8
E7 E7
E10 E10
E9 E9
TXA 310
E2
E1
30 V DC
-
+
BUS
/
19
1
35 79 11 13 15
46 81 01 21 41 6
2
17
18 20
NL
E1
NL
E2
NL
E4
NL
E3
NL
E5
NL
E7
NL
E9
NL
E6
NL
E8
NL
E10
230 V A C
1
2
3
4
Botão de comando
4
TXA310
30V DC
-
+
Bus
auto
E8
E7
E10 E10
E9 E9
13
15
E7
17
E9
19
14
16
18 20
C8 C10
7
9
E5
11
8
10
12
E6
E2
E1
E4 E4
E3 E3
E6 E6
E5 E5
1
3
E1
5
E3
2
4
6
E2 E4
auto
TXA310
30V D C
-
+
Bus
auto
E8
E7
E10 E10
E9 E9
13
15
E7
17
E9
19
14
16
18 20
C8 C10
7
9
E5
11
8
10
12
E6
E2
E1
E4 E4
E3 E3
E6 E6
E5 E5
1
3
E1
5
E3
2
4
6
E2 E4
E10 E10
auto
Ech 60%
L3
L2
L1
N
L3
L2
L1
N
auto
E6
E5
E4
E3
E8 E8
E7 E7
E10 E10
E9 E9
TXA 310
E2
E1
30 V DC
-
+
BUS
/
19
1
35 79 11 13 15
46 81 01 21 41 6
2
17
18 20
NL
E1
NL
E2
NL
E4
NL
E3
NL
E5
NL
E7
NL
E9
NL
E6
NL
E8
NL
E10
230 V A C
1
2
3
4
Botão de comando luminoso de
endereçamento físico
Funktion
När omkopplaren 1 står i Manu (
TXA310
30V DC
-
+
Bus
auto
E8
E7
E10 E10
E9 E9
13
15
E7
17
E9
19
14
16
18 20
C8 C10
7
9
E5
11
8
10
12
E6
E2
E1
E4 E4
E3 E3
E6 E6
E5 E5
1
3
E1
5
E3
2
4
6
E2 E4
auto
TXA310
30V D C
-
+
Bus
auto
E8
E7
E10 E10
E9 E9
13
15
E7
17
E9
19
14
16
18 20
C8 C10
7
9
E5
11
8
10
12
E6
E2
E1
E4 E4
E3 E3
E6 E6
E5 E5
1
3
E1
5
E3
2
4
6
E2 E4
E10 E10
auto
Ech 60%
L3
L2
L1
N
L3
L2
L1
N
auto
E6
E5
E4
E3
E8 E8
E7 E7
E10 E10
E9 E9
TXA 310
E2
E1
30 V DC
-
+
BUS
/
19
1
35 79 11 13 15
46 81 01 21 41 6
2
17
18 20
NL
E1
NL
E2
NL
E4
NL
E3
NL
E5
NL
E7
NL
E9
NL
E6
NL
E8
NL
E10
230 V A C
1
2
3
4
) läge, ger
tryckknapparna 3 möjlighet att simulera anslutna
kontakter.
L2 ställning beror på konfigur
och paramet2
blinkar
laddats upp.
Detektering av anslut
Modulen kan automatiskt detekt
av spänning som är ansluten till varje ingång
(likspänning, växelspänning eller fr
för en potentiell fri kontakt).
Vid första progr
efter en byte av typ av anslut
omstart måste typ av spänning som detekter
sparas.
F
1. Anslut produkten till KNX-bussen
2. Progr
3. Anslut kretsarna till ingångarna
4. Stäng den kontakt som är länkad till ingången
5. Öppna den kontakt som är länkad till ingången
6. Fortsätt på samma sätt för alla ingångar
Efter att produkt
bussavbrott) är det inte nödvändigt att spar
av ansluten krets int
Tryckknapp för fysisk adressering 4
Tryck på ljustryckknappen 4 för att fysiskt adressera
produkten eller kontrollera om busspänning finns till
produkten :
indikeringslampa lyser = buss finns till och produkten
är fysiskt adresserad.
Signalstörning på ingång
I vissa typer av installationer (kabelvägar
eller kablar med flera ledar
att separation av stark str
Närheten till ledningar anslutna till anläggningens
nätaggregat (230V eller 400V) med signalkablar
anslutna till ingångarna på TXA306 kan leda till
att inducerad str
till ingångarna och därmed generer
kommandon.
Genom att använda skärmade kablar för anslutning
av ingångar kan man begränsa fenomenet inducer
ström.
Apparat
behörig elektriker enligt i landet gällande
installationsnormer
F
Om flera pot
måste de var
någon gemensam punkt).
Användningen av en gemensam punkt är
fortfarande möjlig i fallet med 24 ... 230
AC/DC.
Anslut inte tryckknappar eller ljusbrytare till
produktingångarna.
Anslut inte lysdioder par
kontakterna, tryckknapparna eller
omkopplarna som är anslutna till
ingångarna.
o
F
Systeminformasjon
Dette apparatet er et av KNX-systemets produkter
og holder dermed KNX-standard. Man forutsetter at
brukeren har detaljerte fagkunnskaper for å kunne
forstå apparatets funksjoner etter deltakelse på KNX-
kurs. Programmering, installasjon og igangsetting
avapparatetskjervedhjelpavKNX-sertisert
programvar
Funksjonsbeskrivelse
De universelle inngangsmodulene brukes til å
kople sammen med KNX BUS-en, kontakter som
er potensialfrie, eller som får tilført 24...230 V AC/
DC med KNX BUS-en. T
automatismer eller alarmbrytere kan på denne måten
kommunisere.
• 6 uavhengige kanaler med automatisk
gjenopprettelse av den typen nettverk som er
koplet til (24...230V AC/DC eller potensialfritt).
• Detektering av brudd på nettet
detekteringen gjør det mulig å filtrere falske
alarmer som skyldes brudd for inngangene koplet
til samme referansefase.
Disse produktenes nøyaktige funksjoner er avhengige
avkongurasjonogparametriskprogrammering.
Bildeforklaringer
1
TXA310
30V DC
-
+
Bus
auto
E8
E7
E10 E10
E9 E9
13
15
E7
17
E9
19
14
16
18 20
C8 C10
7
9
E5
11
8
10
12
E6
E2
E1
E4 E4
E3 E3
E6 E6
E5 E5
1
3
E1
5
E3
2
4
6
E2 E4
auto
TXA310
30V D C
-
+
Bus
auto
E8
E7
E10 E10
E9 E9
13
15
E7
17
E9
19
14
16
18 20
C8 C10
7
9
E5
11
8
10
12
E6
E2
E1
E4 E4
E3 E3
E6 E6
E5 E5
1
3
E1
5
E3
2
4
6
E2 E4
E10 E10
auto
Ech 60%
L3
L2
L1
N
L3
L2
L1
N
auto
E6
E5
E4
E3
E8 E8
E7 E7
E10 E10
E9 E9
TXA 310
E2
E1
30 V DC
-
+
BUS
/
19
1
35 79 11 13 15
46 81 01 21 41 6
2
17
18 20
NL
E1
NL
E2
NL
E4
NL
E3
NL
E5
NL
E7
NL
E9
NL
E6
NL
E8
NL
E10
230 V A C
1
2
3
4
Bryter
2
TXA310
30V DC
-
+
Bus
auto
E8
E7
E10 E10
E9 E9
13
15
E7
17
E9
19
14
16
18 20
C8 C10
7
9
E5
11
8
10
12
E6
E2
E1
E4 E4
E3 E3
E6 E6
E5 E5
1
3
E1
5
E3
2
4
6
E2 E4
auto
TXA310
30V D C
-
+
Bus
auto
E8
E7
E10 E10
E9 E9
13
15
E7
17
E9
19
14
16
18 20
C8 C10
7
9
E5
11
8
10
12
E6
E2
E1
E4 E4
E3 E3
E6 E6
E5 E5
1
3
E1
5
E3
2
4
6
E2 E4
E10 E10
auto
Ech 60%
L3
L2
L1
N
L3
L2
L1
N
auto
E6
E5
E4
E3
E8 E8
E7 E7
E10 E10
E9 E9
TXA 310
E2
E1
30 V DC
-
+
BUS
/
19
1
35 79 11 13 15
46 81 01 21 41 6
2
17
18 20
NL
E1
NL
E2
NL
E4
NL
E3
NL
E5
NL
E7
NL
E9
NL
E6
NL
E8
NL
E10
230 V A C
1
2
3
4
Led
3
TXA310
30V DC
-
+
Bus
auto
E8
E7
E10 E10
E9 E9
13
15
E7
17
E9
19
14
16
18 20
C8 C10
7
9
E5
11
8
10
12
E6
E2
E1
E4 E4
E3 E3
E6 E6
E5 E5
1
3
E1
5
E3
2
4
6
E2 E4
auto
TXA310
30V D C
-
+
Bus
auto
E8
E7
E10 E10
E9 E9
13
15
E7
17
E9
19
14
16
18 20
C8 C10
7
9
E5
11
8
10
12
E6
E2
E1
E4 E4
E3 E3
E6 E6
E5 E5
1
3
E1
5
E3
2
4
6
E2 E4
E10 E10
auto
Ech 60%
L3
L2
L1
N
L3
L2
L1
N
auto
E6
E5
E4
E3
E8 E8
E7 E7
E10 E10
E9 E9
TXA 310
E2
E1
30 V DC
-
+
BUS
/
19
1
35 79 11 13 15
46 81 01 21 41 6
2
17
18 20
NL
E1
NL
E2
NL
E4
NL
E3
NL
E5
NL
E7
NL
E9
NL
E6
NL
E8
NL
E10
230 V A C
1
2
3
4
Trykknapp
4
TXA310
30V DC
-
+
Bus
auto
E8
E7
E10 E10
E9 E9
13
15
E7
17
E9
19
14
16
18 20
C8 C10
7
9
E5
11
8
10
12
E6
E2
E1
E4 E4
E3 E3
E6 E6
E5 E5
1
3
E1
5
E3
2
4
6
E2 E4
auto
TXA310
30V D C
-
+
Bus
auto
E8
E7
E10 E10
E9 E9
13
15
E7
17
E9
19
14
16
18 20
C8 C10
7
9
E5
11
8
10
12
E6
E2
E1
E4 E4
E3 E3
E6 E6
E5 E5
1
3
E1
5
E3
2
4
6
E2 E4
E10 E10
auto
Ech 60%
L3
L2
L1
N
L3
L2
L1
N
auto
E6
E5
E4
E3
E8 E8
E7 E7
E10 E10
E9 E9
TXA 310
E2
E1
30 V DC
-
+
BUS
/
19
1
35 79 11 13 15
46 81 01 21 41 6
2
17
18 20
NL
E1
NL
E2
NL
E4
NL
E3
NL
E5
NL
E7
NL
E9
NL
E6
NL
E8
NL
E10
230 V A C
1
2
3
4
Trykknapp med lys for fysisk
adressering
TXA306
30V DC
-
+
Bus
auto
E4
E3
E6 E6
E5 E5
9
E5
11
10
12
E6
5
E3
7
6
8
E4
E2 E2
E1 E1
1
3
E1
2
4
E2
E10 E10
auto
auto
Ech 60%
+
N
48 V AC
24 V DC
230 V AC
L
-
L2
N1
L1
N2
L3
N3
TXA306
30V DC
-
+
Bus
auto
E4
E3
E6E6
E5E5
9
E5
11
10
12
E6
5
E3
7
6
8
E4
E2E2
E1E1
1
3
E1
2
4
E2
+
-
+
48 V AC
24 V DC
230 V AC
-
L2
N1
L1
N2
L3
N3
1
3
4
2
Funksjon
Når bryteren 1 er i Manu (
TXA310
30V DC
-
+
Bus
auto
E8
E7
E10 E10
E9 E9
13
15
E7
17
E9
19
14
16
18 20
C8 C10
7
9
E5
11
8
10
12
E6
E2
E1
E4 E4
E3 E3
E6 E6
E5 E5
1
3
E1
5
E3
2
4
6
E2 E4
auto
TXA310
30V D C
-
+
Bus
auto
E8
E7
E10 E10
E9 E9
13
15
E7
17
E9
19
14
16
18 20
C8 C10
7
9
E5
11
8
10
12
E6
E2
E1
E4 E4
E3 E3
E6 E6
E5 E5
1
3
E1
5
E3
2
4
6
E2 E4
E10 E10
auto
Ech 60%
L3
L2
L1
N
L3
L2
L1
N
auto
E6
E5
E4
E3
E8 E8
E7 E7
E10 E10
E9 E9
TXA 310
E2
E1
30 V DC
-
+
BUS
/
19
1
35 79 11 13 15
46 81 01 21 41 6
2
17
18 20
NL
E1
NL
E2
NL
E4
NL
E3
NL
E5
NL
E7
NL
E9
NL
E6
NL
E8
NL
E10
230 V A C
1
2
3
4
), posisjon, brukes
trykknappene 3 simuleres de tilsluttede kontaktene.
LED-enes tilstand 2 er avhengig av konfigurasjonen
og den parametriske programmeringen.
Når alle LED-ene 2 blinker betyr det at feil
applikasjonsprogramvar
Oppdagelse av type kontakt som er tilkoblet
Modulen kan automatisk oppdage spenningstypen
som er koblet til hver inngang (likestrøm, vekselstrøm
eller fravær av strøm for kontakt med fritt potensiale).
Når du programmer
omprogrammering, etter endring i tilkoblet
spenningstype eller etter omstart, er det nødvendig å
lagre spenningstypen som er oppdaget.
Utfør følgende prosedyr
1. Koble produktet til KNX-bussen
2. Programmer produktet via ETS eller Easytool
3. Koble kretsene til inngangene
4. Lukk kontakten som er knyttet til inngangen
5. Åpne kontakten som er knyttet til inngangen
6. Fortsett på samme måte for alle inngangene.
Etter at du har startet produktet på nytt (for eksempel
busskutt), er lagringsprosedyr
typen tilkoblet krets ikke er endr
T 4
Trykk på trykknappen med lys 4 for å foreta fysisk
adressering av produktet eller for å kontrollere
tilstedeværelse av BUS-kabelen
lampen lyser = BUS-kabel til stede og fysisk
adressering av produkt.
Inngangssignalforstyrrelse
I visse typer installasjoner (kabelbrett, trunking
eller flerlederkabler) er det nødvendig å sikre at
høyspennings-/lavspenningsseparasjonen blir
respektert. Nærhet til ledninger som er koblet til
installasjonens strømforsyningsnettverk (230V eller
400V) med signalkablene koblet til inngangene
til TXA306, kan føre til at det oppstår induserte
strømmer i ledningene som er koblet til inngangene,
og som derfor genererer uønskede kommandoer.
Bruken av skjermede kabler for tilkobling til
inngangene gjør det også mulig å begrense
fenomenet med induserte strømmer.
Apparat
elektriker og i henhold til de normer for
installering som gjelder i landet.
Overhold TBT
Hvis flere potensialfrie innganger er
tilkoblet, må de være helt uavhengige
(ingen felles punkter).
Men det er mulig å bruke et felles
punkt ved bruk av kontakter med en
spenningstilførsel på 24 … 230
Ikke koble trykknapper eller lysbryter
produktinngangene.
Ikke koble til varsellamper par
kontaktene, trykknappene eller bryterne
som er koblet til inngangene.
k
. KNX
TXA310
30V DC
-
+
Bus
auto
E8
E7
E10 E10
E9 E9
13
15
E7
17
E9
19
14
16
18 20
C8 C10
7
9
E5
11
8
10
12
E6
E2
E1
E4 E4
E3 E3
E6 E6
E5 E5
1
3
E1
5
E3
2
4
6
E2 E4
auto
TXA310
30V D C
-
+
Bus
auto
E8
E7
E10 E10
E9 E9
13
15
E7
17
E9
19
14
16
18 20
C8 C10
7
9
E5
11
8
10
12
E6
E2
E1
E4 E4
E3 E3
E6 E6
E5 E5
1
3
E1
5
E3
2
4
6
E2 E4
E10 E10
auto
Ech 60%
L3
L2
L1
N
L3
L2
L1
N
auto
E6
E5
E4
E3
E8 E8
E7 E7
E10 E10
E9 E9
TXA 310
E2
E1
30 V DC
-
+
BUS
/
19
1
35 79 11 13 15
46 81 01 21 41 6
2
17
18 20
NL
E1
NL
E2
NL
E4
NL
E3
NL
E5
NL
E7
NL
E9
NL
E6
NL
E8
NL
E10
230 V A C
1
2
3
4
1
LED
TXA310
30V DC
-
+
Bus
auto
E8
E7
E10 E10
E9 E9
13
15
E7
17
E9
19
14
16
18 20
C8 C10
7
9
E5
11
8
10
12
E6
E2
E1
E4 E4
E3 E3
E6 E6
E5 E5
1
3
E1
5
E3
2
4
6
E2 E4
auto
TXA310
30V D C
-
+
Bus
auto
E8
E7
E10 E10
E9 E9
13
15
E7
17
E9
19
14
16
18 20
C8 C10
7
9
E5
11
8
10
12
E6
E2
E1
E4 E4
E3 E3
E6 E6
E5 E5
1
3
E1
5
E3
2
4
6
E2 E4
E10 E10
auto
Ech 60%
L3
L2
L1
N
L3
L2
L1
N
auto
E6
E5
E4
E3
E8 E8
E7 E7
E10 E10
E9 E9
TXA 310
E2
E1
30 V DC
-
+
BUS
/
19
1
35 79 11 13 15
46 81 01 21 41 6
2
17
18 20
NL
E1
NL
E2
NL
E4
NL
E3
NL
E5
NL
E7
NL
E9
NL
E6
NL
E8
NL
E10
230 V A C
1
2
3
4
2
BP
TXA310
30V DC
-
+
Bus
auto
E8
E7
E10 E10
E9 E9
13
15
E7
17
E9
19
14
16
18 20
C8 C10
7
9
E5
11
8
10
12
E6
E2
E1
E4 E4
E3 E3
E6 E6
E5 E5
1
3
E1
5
E3
2
4
6
E2 E4
auto
TXA310
30V D C
-
+
Bus
auto
E8
E7
E10 E10
E9 E9
13
15
E7
17
E9
19
14
16
18 20
C8 C10
7
9
E5
11
8
10
12
E6
E2
E1
E4 E4
E3 E3
E6 E6
E5 E5
1
3
E1
5
E3
2
4
6
E2 E4
E10 E10
auto
Ech 60%
L3
L2
L1
N
L3
L2
L1
N
auto
E6
E5
E4
E3
E8 E8
E7 E7
E10 E10
E9 E9
TXA 310
E2
E1
30 V DC
-
+
BUS
/
19
1
35 79 11 13 15
46 81 01 21 41 6
2
17
18 20
NL
E1
NL
E2
NL
E4
NL
E3
NL
E5
NL
E7
NL
E9
NL
E6
NL
E8
NL
E10
230 V A C
1
2
3
4
3
TXA310
30V DC
-
+
Bus
auto
E8
E7
E10 E10
E9 E9
13
15
E7
17
E9
19
14
16
18 20
C8 C10
7
9
E5
11
8
10
12
E6
E2
E1
E4 E4
E3 E3
E6 E6
E5 E5
1
3
E1
5
E3
2
4
6
E2 E4
auto
TXA310
30V D C
-
+
Bus
auto
E8
E7
E10 E10
E9 E9
13
15
E7
17
E9
19
14
16
18 20
C8 C10
7
9
E5
11
8
10
12
E6
E2
E1
E4 E4
E3 E3
E6 E6
E5 E5
1
3
E1
5
E3
2
4
6
E2 E4
E10 E10
auto
Ech 60%
L3
L2
L1
N
L3
L2
L1
N
auto
E6
E5
E4
E3
E8 E8
E7 E7
E10 E10
E9 E9
TXA 310
E2
E1
30 V DC
-
+
BUS
/
19
1
35 79 11 13 15
46 81 01 21 41 6
2
17
18 20
NL
E1
NL
E2
NL
E4
NL
E3
NL
E5
NL
E7
NL
E9
NL
E6
NL
E8
NL
E10
230 V A C
1
2
3
4
4
TXA310
30V DC
-
+
Bus
auto
E8
E7
E10 E10
E9 E9
13
15
E7
17
E9
19
14
16
18 20
C8 C10
7
9
E5
11
8
10
12
E6
E2
E1
E4 E4
E3 E3
E6 E6
E5 E5
1
3
E1
5
E3
2
4
6
E2 E4
auto
TXA310
30V D C
-
+
Bus
auto
E8
E7
E10 E10
E9 E9
13
15
E7
17
E9
19
14
16
18 20
C8 C10
7
9
E5
11
8
10
12
E6
E2
E1
E4 E4
E3 E3
E6 E6
E5 E5
1
3
E1
5
E3
2
4
6
E2 E4
E10 E10
auto
Ech 60%
L3
L2
L1
N
L3
L2
L1
N
auto
E6
E5
E4
E3
E8 E8
E7 E7
E10 E10
E9 E9
TXA 310
E2
E1
30 V DC
-
+
BUS
/
19
1
35 79 11 13 15
46 81 01 21 41 6
2
17
18 20
NL
E1
NL
E2
NL
E4
NL
E3
NL
E5
NL
E7
NL
E9
NL
E6
NL
E8
NL
E10
230 V A C
1
2
3
4
.(
.
:
KNX
l’ ETS
.
( )
.
(
TX
.
.
230 -24
.
.
:
6LE000121E
TXA306
Eliminación correcta de este producto
(material eléctrico y electrónico de descarte).
(Aplicable en la Unión Europea y en países europeos
con sistemas de recogida selectiva de residuos).
La presencia de esta marca en el producto o en el material infor-
mativoque
deberá eliminarse junto con otros residuos domésticos. Para evitar
los posibles daños al medio ambiente y a la salud humana que
representa la eliminación incontrolada de residuos, separe este
producto de otros tipos de residuos y reciclelo correctamente para
promover la reutilización sostenible de recursos materiales.
Los usuarios particulares pueden contactar con el establecimiento
donde adquirieron el producto, o con las autoridades locales perti-
nentes, para informarse sobre cómo y dónde pueden llevarlo para
que sea sometido a un reciclaje ecológico y seguro.
Los usuarios comerciales pueden contactar con su proveedor y
consultar las condiciones del contrato de compra. Este producto
no debe eliminarse mezclado con otros residuos comerciales.
Utilizable en Europa
M
y en Suiza
Eliminação correcta deste produto
(Resíduo de Equipamentos Eléctricos e Electrónicos).
Esta marca, apresentada no produto ou na sua literatura
indica que ele não deverá ser eliminado juntamente com
osresíduos
devida
causados pela eliminação incontrolada de resíduos deverá sepa-
rar este equipamento de outros tipos de resíduos e reciclá-lo de
forma responsável, para promover uma reutilização sustentável
dos recursos materiais.
Os utilizadores domésticos deverão contactar ou o estabelecimen-
toonde
para obterem informações sobre onde e de que forma podem
levar este produto para permitir efectuar uma reciclagem segura
em termos ambientais.
Osutilizadores
e consultar os termos e condições do contrato de compra. Este
produto não deverá ser misturado com outros resíduos comerciaís
para eliminação.
Utilizável em toda a Europa
M
e na Suíça
Korrekt avfallshantering av produkten
(elektriska och elektroniska produkter).
Denna markering på produkten och i manualen anger att
den inte bör sorteras tillsammans med annat hushållsavfall
när dess livstid är över. Till förebyggande av skada på miljö och
hälsa bör produkten hanteras separat för ändamålsenlig återvin-
ning av dess beståndsdelar.
Hushållsanvändare bör kontakta den återförsäljare som sålt pro-
dukten eller sin kommun för vidare information om var och hur
produkten kan återvinnas på ett miljösäkert sätt.
Företagsanvändarebör-
vna villkor i köpekontraktet. Produkten bör inte hanteras tillsam-
mans med annat kommersiellt avfall.
Får användas inom Europa
M
och i Schweiz
M
Hvordan avhende dette produktet
(avfall fra elektriske og elektroniske produkter).
(Gjelder for de EU-land og andre europeiske land som
har systematiserte ordninger for selektiv avfallsinns-
amling).
Dette symbolet på produktet eller i dokumentasjonen betyr at
produktet ikke må behandles som husholdningsavfall. Ukontrollert
destruering av denne type avfall vil skade miljøet og menneskenes
helse, derfor skal dette produktet skilles ut fra annet avfall, og
gjenvinnes på en forsvarlig måte. Du vil derved bidra aktivt til for-
svarlig gjenbruk av materielle ressurser.
Privatpersoner må kontakte forhandleren som de har kjøpt pro-
duktet av, eller de må ta kontakt med de lokale myndighetene for
å vite hvordan de kan kvitte seg med produktet på en miljøvennlig
måte.
Bedriftene må ta kontakt med sine leverandører og sørge for å lese
salgsavtalene.
Produktet skal ikke avhendes med annet ordinært avfall fra bedriften.
Kan brukes overalt i Europ
M
og i Sveits