Manual.ly Logo

AXAGON M.2 SSD Enclosure Manual

0,0 · 0 Valoraciones

Manual en PDF · 2 Páginas

Español

M: QW-35-FL
página

/ 2

Loading...
6dd2dc9d84ca54c3b19bc4c1e2534b9fcc71 page 1
FIN
GR
FR
ESP
PL PT RO
RU
HR HU
NL
IT SK SWE TR
BG
CZ
DK
DE
EN
Namontujte disk
do boxu.
(viz obrázky 1- 4 na další straně)
Montieren Sie
die Festplatte in
die Box.
(siehe Abbildungen 1- 4 auf
der weiteren Seite)
Monter disk til boksen.
(fig. 1-4 på næste side)
Zapněte počítač.
Schalten Sie
den Rechner ein.
Tænd for computeren.
Připojte box
k USB portu PC.
Schließen Sie
die Box an
den USB-Anschluss
des Rechners an.
Slut kassen til
USB-porten på
computeren.
Proběhne
automatická
instalace.
Es erfolgt eine
automatische
Installation.
En automatisk
installation vil
blive udført.
Nejsou potřeba
žádné externí
ovladače.
Es sind keine
externen
Treiber notwendig.
Du behøver ikke
installere eksterne
drivere.
Externí disk
je připraven.
Die externe
Festplatte ist
vorbereitet.
Den eksterne
disk er klar til brug.
Nový disk inicializujte
a naformátujte
ve Správě disků.
(viz obrázek B)
Zkontrolujte
úspěšnou
instalaci
ve Správci zařízení.
(viz obrázek A)
I enhedsstyringen
skal du kontrollere
den succesfulde
installation.
(fig. A)
Kontrollieren Sie
die erfolgreiche
Installation in
der
Geräteverwaltung.
(siehe Abbildung A)
I Disc Manager skal
du initialisere og
den nye disk og
formatere den.
(fig. B)
Initialisieren Sie
die neue Festplatte
und formatieren Sie sie
im Festplattenmanager.
(siehe Abbildung B)
Mount disk
to the box.
(fig. 1-4 at next page)
Turn on computer.
Plug the box to
the USB port
of the computer.
An automatic
installation
will be performed.
No need to install
any external drivers.
The external disk
is ready to use.
In the Device manager,
please check
the successful
installation.
(fig. A)
In the Disc manager,
please initialize
the new disk
and format it.
(fig. B)
Monte el disco en
la caja.
(ver figuras 1- 4
en la página siguiente)
Encienda
el ordenador.
Conecte la caja al
puerto USB del PC.
Se procede
a la instalación
automática.
No es necesario
instalar controladores
externos adicionales.
El disco externo
está preparado.
Compruebe que
la instalación se
ha realizado con éxito
en el Administrador
de dispositivos.
(ver figura A)
Inicialice el nuevo
disco y formatéelo
en el Administrador
de discos.
(ver figura B)
Kiinnitä kiintolevy
laatikkoon.
(kuvat 1-4 seuraavalla sivulla)
Kytke tietokone
päälle.
Liitä laatikko
tietokoneen
USB-väylään.
Automaattinen
asennus suoritetaan.
Ulkoisia ajureita
ei tarvitse asentaa.
Ulkoinen levy on
valmis käytettäväksi.
Tarkista laitteen
onnistunut
asentaminen
Laitehallinnasta.
(kuva A)
Käynnistä
Levynhallinta
ja alusta uusi levy.
(kuva B)
Τοποθέτηση Δίσκου
στο κουτί.
(εικόνες 1- 4 στην επόμενη σελίδα)
Ανοίξτε τον
υπολογιστή.
Συνδέστε το κουτί
στην θύρα USB του
υπολογιστή.
Θα εκτελεστεί
μια αυτόματη
εγκατάσταση.
Δεν χρειάζεται να
εγκαταστήσετε
εξωτερικούς drivers.
Ο εξωτερικός δίσκος
είναι έτοιμος για χρήση.
Στην Διαχείριση
Συσκευών, παρακαλώ
ελέγξτε ότι έγινε
σωστή εγκατάσταση.
(εικόνα A)
Στην Διαχείριση Δίσκου,
παρακαλώ κάντε
έναρξη του νέου δίσκου
και στην συνέχεια κάντε
του format.
(εικόνα B)
Postavite disk
na kutiju.
(slika. 1 - 4 na sljedećoj stranici)
Upalite računalo..
Priključite kutiju
na USB priključak
računala.
Izvršit će se
automatska
instalacija.
Nije potrebno
instalirati dodatne
upravljačke
programe.
Vanjski disk je
spreman za
uporabu.
U Upravitelju
uređaja, molimo
provjerite
uspješnost
instalacije.
(slika A)
U Upravljanju
diskovima, molimo
inicijalizirajte novi
disk i formatirajte ga.
(slika B)
Monteer de schijf
aan de doos.
(afb. 1 - 4 op volgende pagina)
Schakel de computer in.
Sluit de doos aan op
de USB-poort
van de computer.
Er wordt een
automatische
installatie uitgevoerd.
U hoeft geen externe
stuurprogramma's
te installeren.
De externe schijf is
klaar voor gebruik.
Controleer in
de apparaat beheerder
de succesvolle
installatie.
(afb. A)
In de Disc Manager
initialiseert u
de nieuwe disc
en formatteert u deze.
(afb. B)
Monte o HDD
na caixa.
(fig. 1 - 4 na próxima página)
Ligue
o computador.
Conecte a caixa
à porta USB do
computador.
Será executada
uma instalação
automática.
Não há necessidade
de instalar drivers
externos.
O disco externo
está pronto
para uso.
No gestor de
Dispositivos,
verifique
a instalação
bem-sucedida.
(fig. A)
No gestor de Discos,
por favor inicialize
o novo disco
e formate-o.
(fig. B)
Montera disken
på boxen.
(bild 1- 4 på nästa sida)
Starta datorn.
Anslut boxen till
datorns USB-uttag.
Automatisk
installation sker.
Inga drivrutiner
behöver installeras.
Den externa
disken är klar
att användas.
Gå till
enhetshanteraren
för att se
installationen.
(bild A)
Gå till
diskhanteraren
och starta den
nya skivan och
formatera den.
(bild B)
Disk'yi kutuya
takın.
(şek. sonraki sayfada 1- 4)
Bilgisayarı açın.
Kutuyu bilgisayarın
USB portuna takın.
Kurulum otomatik
olarak başlayacaktır.
Herhangi bir
harici sürücü
kurmanıza gerek
yok.
Harici disk
kullanıma hazır.
Lütfen Aygıt
Yöneticisinden,
kurulumun başarılı
olup olmadığını
kontrol edin.
(şek. A)
Lütfen Disk
Yöneticisinde,
yeni diski başlatın
ve biçimlendirin.
(şek. B)
Montez le disque
dans la boîte.
(voir images 1 a 4
de la page suivante)
Allumez
l'ordinateur.
Connectez la boîte
au port USB du PC.
L'installation aura
automatiquement
lieu.
Aucun pilote externe
n'est nécessaire.
Le disque
externeest pret.
Vérifiez la bonne
installation dans
le Gestionnaire
de périphériques.
(voir image A)
Initialisez le nouveau
disque et formatez-le
dans le Gestionnaire
de disques.
(voir image B)
Szerelje a meghajtást
a dobozba.
(lásd az 1 - 4 ábrákat
a következő oldalon)
Kapcsolja be
a számítógépet.
Csatlakoztassa
a dobozt a
számítógép USB
bemenetéhez.
Végbemegy az
automatikus
telepítés.
Nem szükséges
semmilyen
külső vezérlő.
A külső lemez
készenlétben van.
Ellenőrizze a sikeres
telepítést
az Eszközkezelőben.
(lásd az A ábrát)
Az új lemezt
inicializálja
és formátozza
a Lemezkezelésben.
(lásd az B ábrát)
Montate il disco
nel box.
(vedi disegni 1 - 4 sull'altro lato)
Accendete
il computer.
Collegate il box
alla porta USB del PC.
Ha luogo
l'installazione
automatica.
Non è necessario
nessun driver
esterno.
Il disco esterno
è pronto.
Controllate l'esito
positivo
dell'installazione
nella Gestione
periferiche.
(vedi disegno A)
Inizializzate
e formattate
il nuovo disco
nella Gestione
dei dischi.
(vedi disegno B)
Proszę zamontować
dysk w obudowie.
(patrz ilustracje 1 - 4
na następnej stronie)
Proszę włączyć
komputer.
Proszę podłączyć
urządzenie
do portu USB
komputera.
Urządzenie zostanie
zainstalowane
automatycznie.
Nie są potrzebne
żadne sterowniki
zewnętrzne.
Dysk zewnętrzny
jest gotowy do pracy.
Proszę skontrolować
stan instalacji
przez funkcję
Administrator
urządzeń.
(patrz ilustracja A)
Proszę inicjalizować
i sformatować
nowy dysk
przez funkcję
Administrator dysków.
(patrz ilustracja B)
Montaţi
discul încasetă.
(a se vedea fig. 1 - 4 de
pe pagina următoare)
Porniţi PC-ul.
Conectaţi caseta
la portul USB
al PC-ului.
Rulează instalarea
automată.
Nu sunt necesare
niciun fel de
drivere externe.
Discul extern
este pregătit.
Verificaţi
corectitudinea
instalării
în Manager
dispozitive.
(a se vedea fig. A)
Discul nou se
iniţializează
şi se formatează
în Manager discuri.
(a se vedea fig. B)
Установить диск
в бокс.
(см. рисунки 1 - 4
на следующей странице)
Включить
компьютер.
Подключить
бокс к USB-порту
ПК.
Происходит
автоматическая
установка.
Не требуется
никаких
внешних
драйверов.
Внешний диск
подготовлен.
Проверить
успешность
установки
в «Диспетчере
устройств»
(см. рисунок A)
Новый диск
инициализировать
и отформатировать
в «Управлении
дисками»
(см. рисунок B)
Namontujte disk
do boxu.
(viď obrázky 1- 4 na ďalšej strane)
Zapnite počítač.
Pripojte box
k USB portu PC.
Prebehne
automatická
inštalácia.
Nie sú potrebné
žiadne externé
ovládače.
Externý disk
je pripravený.
Nový disk inicializujte
a naformátujte
v Správe diskov.
(viď obrázok B)
Skontrolujte
úspešnú inštaláciu
v Správcovi zariadení.
(viď obrázok A)
Инсталирайте диска
в кутията.
(виж изображения 1 - 4
на следващата страница)
Включете компютъра.
Свържете кутията
към USB порта
на компютъра.
Протича автоматична
инсталиране.
Няма нужда
от никакви
външни драйвери.
Външният диск
е подготвен.
Проверете
успешното
инсталиране
в "Device manager".
(вижтe изображение A)
Инициализирайте
новия диск
и го форматирайте
в "Disk management".
(вижтe изображение B)
TECHNICAL SPECIFICATIONS
OPEN THE BOX
1.
2.
3.
1. 将HDD(硬盘驱动器)安装到如下一页图1- 4所示的盒子上。
2. 打开电脑。
3. 将盒子插入计算机的USB端口。
4. 此时将执行自动安装。
5. 这一过程中无需安装任何外部驱动程序。
6. 外部光盘已准备就绪。
7. 在设备管理器中,请检查安装是否成功(图A)。
8. 在光盘管理器中,请将新光盘初始化并对其进行格式化(图B)。
-
-
-
-
-
-
-
-
CN
ARA
USB
A
B
4-1
FIGURE A
Only devices which are added
to the Device Manager
when installing the case
and the hard drive are displayed.
printscreen ENG W10
CHECK CORRECT INSTALLATION IN DEVICE MANAGER
FIGURE B
INITIALIZE THE NEW DISK AND FORMAT IT IN DISK MANAGEMENT
printscreen ENG W10
The safest method for removing
from he computer is the utilization
of Safely Remove Hardware function
in Windows operation system.
printscreen ENG W10
SAFE DISCONNECTION OF EXTERNAL BOX
INSTRUCTIONS
FOR USE
(original)
revision 2.1
EEM2-UG2
Instructies voor gebruik (vertaling)
Instrukcja użycia (tłumaczenie)
Instruções de utilização (translação)
Instrucțiuni pentru utilizare (traducere)
Инструкция по эксплуатации (трансляция)
Návod na použitie (preklad)
Användarinstruktioner (translation)
Kullanım talimatları (tercüme)
Инструкции за Употреба (превод)
使用明
(翻译)
( )
NL
PL
PT
RO
RU
SK
SWE
TR
BG
CN
ARA
Instructions for use (original)
Návod k použití (originál)
Gebrauchsanweisungen (Übersetzung)
Brugsanvisning (translation)
Instrucciones de uso (traducción)
Käyttöohjeet (käännös)
Instructions d'utilisation (traduction)
Oδηγίες χρήσης (μετάφραση)
Upute za korištenje (prijevod)
Felhasználói kézikönyv (fordítás)
Istruzioni per l'uso. (traduzione)
ENG
CZ
DE
DK
ESP
FIN
FR
GR
HR
HU
IT
© 2020 AXAGON
Výrobce / Manufacturer: RealQ s.r.o. - Železná 5, 619 00 Brno, Czech Republic
All rights reserved. All text and pictorial materials contained in this document
are protected by Copyright Act.
All marks indicated here are the registered trademarks of their appropriate owners.
Specifications are subject to change without prior notice.
Made in CHINA for Axagon.
http://axagon.eu/produkty/eem2-ug2#supportLinkGoal
PRODUCT SUPPORT LINK
SUPERSPEED
USBC 10 Gbps
BOX
for NVMe M.2 SSD
ENG SuperSpeed USB 10Gbps external enclosure for NVMe M.2 SSD
CZ SuperSpeed USB 10Gbps externí box pro NVMe M.2 SSD
DE SuperSpeed USB 10Gbps externes Gehäuse für NVMe M.2 SSD
DK SuperSpeed USB 10Gbps ekstern kabinet til NVMe M.2 SSD
ESP Caja externa SuperSpeed USB 10Gbps para NVMe M.2 SSD
FIN SuperSpeed USB 10Gbps ulkoinen kotelo NVMe M.2 SSD
FR Boîtier externe SuperSpeed USB 10Gbps pour NVMe M.2 SSD
GR Εξωτερική θήκη SuperSpeed USB 10Gbps για NVMe M.2 SSD
HR SuperSpeed USB 10Gbps vanjsko kućište zar NVMe M.2 SSD
HU SuperSpeed USB 10Gbps külső doboz NVMe M.2 SSD-khez
IT Custodia esterna SuperSpeed USB 10Gbps per NVMe M.2 SSD
NL SuperSpeed USB 10Gbps externe behuizing voor NVMe M.2 SSD
PL Zewnętrzna obudowa SuperSpeed USB 10Gbps dla NVMe M.2 SSD
PT Compartimento externo SuperSpeed USB 10Gbps para NVMe M.2 SSD
RO Carcasă externă SuperSpeed USB 10Gbps pentru NVMe M.2 SSD
RU Внешний контейнер с SuperSpeed USB 10Gbps для NVMe M.2 SSD
SK SuperSpeed USB 10Gbps externý box pre NVMe M.2 SSD
SWE SuperSpeed USB 10Gbps externa utrymmen för NVMe M.2 SSD
TR NVMe M.2 SSD için SuperSpeed USB 10Gbps harici muhafaza
BG SuperSpeed USB 10Gbps външно приложение за NVMe M.2 SSD
CN SuperSpeed USB 10Gbps 外壳,适用于 NVMe M.2 SSD
ARA NVMe M.2 SSD صاﺮﻗﻸﻟ SuperSpeed USB 10Gbps ﺔﯿﺟرﺎﺨﻟا
A
B
A use thermal conductive pads
B
C
B
insert the NVMe M.2 SSD DISK
C insert the mouting nut to NVMe M.2 SSD DISK
thermal conductive pad
BOTTOM
TOP
INSERT THE NVMe M.2 SSD DISK
FIX THE NVMe M.2 SSD DISK
A fix the M.2 SSD DISK with the screw on the BACK of the BOX
A
4.
CLOSE THE BOX
A
B
INPUT INTERFACE
USB 3.2 Gen 2 SuperSpeed+ up to 10 Gbit/s, backward compatible with USB 2.0
USB type C female connector
SUPPORTED DEVICES
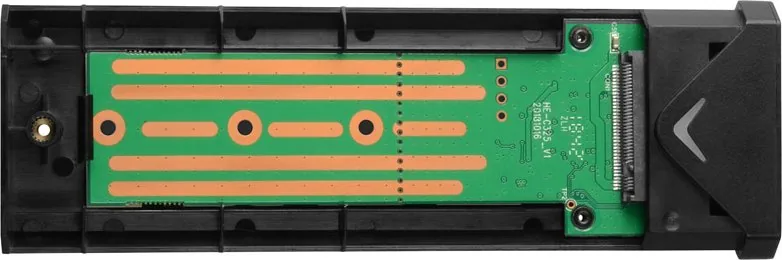
NVMe (PCI-Express) M.2 SSD single or double sided disks, no disk capacity limitation
M.2 disk dimension support: 2242, 2260, 2280 mm
M-KEY AND B+M-KEY M.2 SSD disks supported
NGFF 75-pin M-key slot for NVMe M.2 disks
SIZE NET WEIGHT
115 x 39 x 11 mm, 43 g
POWER SUPPLY
USB bus power
power supply via USB 3.0 is fully sufficient in all cases.
LED INDICATION
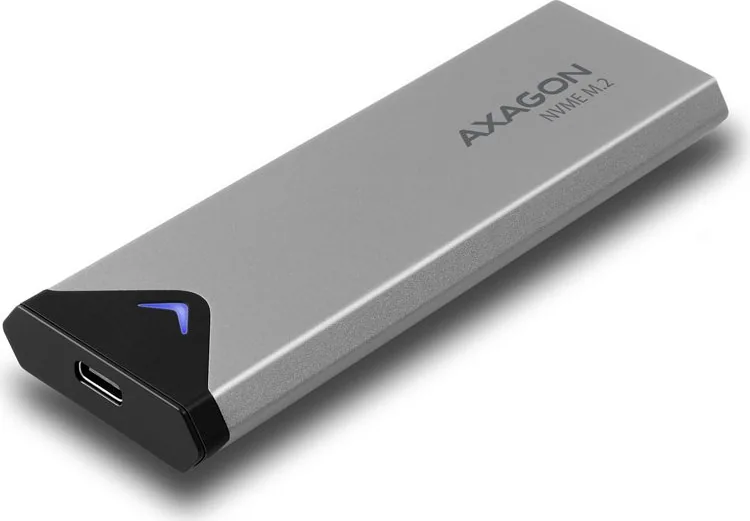
Decent blue LED indicates USB connection and data transfer
OS SUPPORTED
MS Windows 7 / 8 / 8.1 / 10 and later
Windows Server 2008 / 2012 / 2016 and later
32- and 64-bit version supported
Mac OS X 10.x and later
Linux 2.6.x and later
Android (OTG and device support needed)
Note: drivers are usually part of OS; when Windows 7 used it is necessary
to check OS support and driver availability with the M.2 SSD manufacturer.
OTHER FEATURES
Data transfer rates 480 / 5000 / 10 000 Mbit/s (high / superspeed / superspeed+).
The total bandwidth / transmission rate of the box is determined by the USB 3.2 Gen 2
interface used (theoretically up to 10 Gbit/s)
The real bandwidth / transmission rate of the box is about 1000 MB/s
(1 GB/s) it is given by the limits of the USB 3.2 Gen 2 interface
Compliant with PCI Express Base Specification Revision 3.1a specification
Compliant with NVM Express 1.3 specification
Compliant with USB Mass Storage Class specification
Supports UASP (USB Attached SCSI) for faster data transmission in Windows 8 and later
Supports BOT (Bulk-Only Transport)
Support of TRIM functionality to limit gradual degradation of the SSD performance over time
SSD boot support in external box
Possibility to connect your device while running thanks to the Hot Plug support
Full Plug and Play support.
Sleep mode support – after 5 minutes of inactivity
Aluminum body helps to cool the M.2 SSD
Higher box surface temperature is not a defect - thanks to the aluminum body, the heat
generated by the disk operation is better drained and transferred to the environment

Chatee con su manual de AXAGON M.2 SSD Enclosure usando IA

Obtenga respuestas instantáneas de IA de su manual de AXAGON M.2 SSD Enclosure

Pregunte lo que quiera sobre AXAGON M.2 SSD Enclosure. Las respuestas provienen de este manual, con las páginas en las que se basan.

Haz una Pregunta

0/1000

¿Recomiendas M.2 SSD Enclosure?

Sí No

Preguntas frecuentes

A

Esta carcasa soporta SSDs M.2 NVMe (PCI-Express). Funciona con discos de una o doble cara en tamaños 2242, 2260 y 2280 mm. No soporta unidades M.2 basadas en SATA.

¿Esta respuesta fue útil?

A

No se necesitan controladores externos. El dispositivo usa protocolos estándar de clase de almacenamiento masivo USB. La mayoría de los sistemas operativos como Windows 7 y posteriores, macOS y Linux lo reconocerán automáticamente al conectarlo.

¿Esta respuesta fue útil?

A

Despues de conectar la caja a su computadora, abra la herramienta Administracion de Discos en su SO. Inicialice el nuevo disco y formatee segun su sistema de archivos preferido. Verifique el Administrador de Dispositivos para confirmar una instalacion exitosa primero.

¿Esta respuesta fue útil?

A

Si, el cuerpo de aluminio puede calentarse durante la operacion. Este es un comportamiento esperado ya que el metal ayuda a disipar el calor generado por el SSD. No es un defecto sino una caracteristica del diseno de enfriamiento.

¿Esta respuesta fue útil?

A

Si, la carcasa soporta el arranque desde un SSD externo. Sin embargo, debe asegurarse de que la configuracion de su BIOS/UEFI permita arrancar desde dispositivos USB y que el SO este instalado correctamente en la unidad externa.

¿Esta respuesta fue útil?

A

Desconectar sin usar la funcion Eliminar Hardware de forma segura puede llevar a la corrupcion o perdida de datos. Siempre use la opcion de eliminacion segura proporcionada por su sistema operativo antes de desconectar el dispositivo.

¿Esta respuesta fue útil?

A

Si, funciona con dispositivos Android que soportan OTG (On-The-Go) y tienen los controladores de dispositivo necesarios. Necesitara un adaptador de USB-C a USB-A o USB-C a USB-C dependiendo del puerto de su telefono.

¿Esta respuesta fue útil?

M: QW-35-FL

Ventajas y Desventajas

Ventajas

  • Soporta velocidades ultra rapidas USB 3.2 Gen 2 de hasta 10 Gbps
  • El cuerpo de aluminio proporciona un enfriamiento pasivo excelente para el SSD
  • El diseno plug-and-play no requiere instalacion de controladores externos
  • Compatible con multiples SO incluyendo Windows, Mac, Linux y Android
  • Soporta comandos UASP y TRIM para mejor rendimiento y longevidad
VS

Desventajas

  • Solo soporta SSDs M.2 NVMe, no unidades M.2 basadas en SATA
  • La temperatura del dispositivo aumenta durante el uso intenso, aunque esto es normal
  • Requiere inicializacion y formateo manual del nuevo disco despues de la conexion
  • El suministro de energia depende unicamente de la energia del bus USB lo cual puede limitar algunas unidades de alto consumo
  • La instalacion fisica requiere manejo cuidadoso de pequenos tornillos y componentes
M: QW-35-FL

Producto Especificación

Factor de forma

M.2 2280, M.2 2260, M.2 2242

Conector interno

1x M.2 (PCIe 3.0 x4, NVMe)

Conector externo

1x USB-C 3.1 (10 Gb/s)

Nivel RAID

No aplicable

Ventilador

No aplicable

Dimensiones

11,51x3,89x1,09 cm

Peso

43,09 g

Color

plateado

Características

Caja de aluminio, instalación sin herramientas, instalación sin tornillos, incluye cable USB (USB-A)

Garantía del fabricante

dos años

Ortografía de USB

Enlace

M: QW-35-FL

Producto Descripción

AXAGON Carcasa para Disco Duro M.2: Desbloqueando Velocidad Portátil

La carcasa AXAGON para Disco Duro M.2 en Plata es una solución elegante y eficiente para expandir sus capacidades de almacenamiento utilizando SSDs NVMe M.2. Diseñada con un cuerpo de aluminio duradero, esta carcasa no solo protege su unidad sino que también gestiona activamente el calor a través de su superficie conductiva, asegurando un rendimiento óptimo durante tareas intensivas. El dispositivo soporta interfaces SuperSpeed USB 3.2 Gen 2, entregando tasas de transferencia teóricas de hasta 10 Gbps, lo que se traduce en velocidades reales de aproximadamente 1000 MB/s.

Instalar un SSD NVMe M.2 en esta caja es un proceso sencillo que no requiere controladores externos ni software complejo. Simplemente monte la unidad, conecte la unidad mediante el puerto USB-C a su computadora y deje que el sistema operativo se encargue del resto automáticamente. La carcasa soporta varias dimensiones de disco M.2 incluyendo formatos 2242, 2260 y 2280 mm, haciéndola versátil para diferentes necesidades de almacenamiento. Ya sea que esté ejecutando Windows, macOS, Linux o Android, este dispositivo plug-and-play asegura compatibilidad entre múltiples plataformas sin complicaciones.

El acabado plateado añade una estética moderna a cualquier espacio de trabajo, mientras que el tamaño compacto lo hace altamente portátil. Los usuarios pueden inicializar y formatear sus nuevas unidades directamente a través del Administrador de Discos en Windows o herramientas equivalentes en otros sistemas operativos. Con soporte para UASP y funcionalidad TRIM, la transmisión de datos sigue siendo rápida y la longevidad de su SSD se preserva con el tiempo. Esta carcasa es ideal para entusiastas de la tecnología que buscan reutilizar unidades antiguas o crear soluciones de almacenamiento externo de alta velocidad para juegos y trabajo profesional.

Notas Importantes

  • Asegúrese de que las almohadillas térmicas estén colocadas correctamente antes de cerrar la caja para un enfriamiento adecuado.
  • Use la función Eliminar Hardware de forma segura para desconectar el dispositivo y prevenir corrupción de datos.
  • La carcasa de aluminio puede calentarse durante la operación, lo cual es normal debido a la disipación de calor.
M: QW-35-FL

© Copyright 2026 Manual.ly